PostgreSQL – Python – Apache – Bootstrap
Simple web application
In this exercise, we will show some data we have in PostgreSQL on the front end.
For this, we will query our data from our PostgreSQL database using Python and show it on the front end using Bootstrap for formatting via Apache webserver.
This is an example of using a combination of different technologies we have learned for a simple web application.
1. Setup Apache
|
1 |
sudo apt-get install apache2 |
Verify service is running:
|
1 |
service apache2 status |
Verify it is working
Visit http://localhost on your virtual machine – you should see the apache test page.
2. Query Data from PostgreSQL using python
For this we will use the same data we loaded in:
Environment
|
1 2 3 4 5 6 7 8 9 10 11 12 13 14 15 16 17 18 19 20 21 22 |
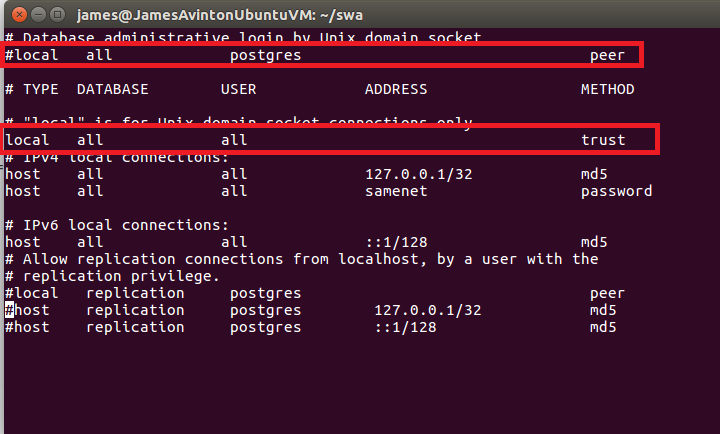
# Go to home directory cd ~ # Create directory for application mkdir swa # Create new python file for our code touch swa.py # Install Python module to connect to PostgreSQL sudo apt-get install python-psycopg2 # Install Setuptools which is required for Flask sudo pip install setuptools # Install Flask - A web framework for Python sudo pip install Flask # Update the postgresql pg_hba.conf file to allow for python to connect to it vi /etc/postgresql/9.5/main/pg_hba.conf # make changes highlighted in red below |

|
1 2 3 |
# Restart PostgreSQL Server sudo service postgresql stop sudo service postgresql start |
Now the environment is set up.
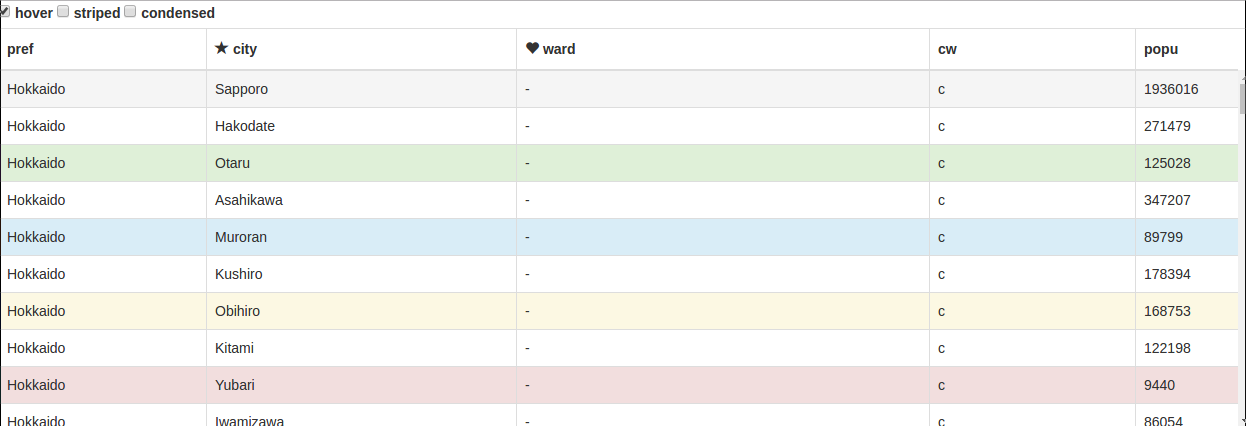
Create a Python program that connects to the database – retrieves the japan_cities table and displays it on a web page using Bootstrap Tables
Hints:
SQL in JSON
You can use this SQL below to return the data from the database in JSON format:
|
1 2 3 4 5 6 7 8 9 10 |
select jsonb_pretty(to_jsonb(array_agg(json_build_object( 'prefecture', prefecture, 'city', city, 'ward', ward, 'population', population, 'city_ward', city_ward)))) from japan_cities ; |
Use Bootstrap Table to display the data
Use Flask framework for running the python webservice example:
|
1 2 3 4 5 6 7 8 9 10 11 12 13 14 15 16 17 18 19 20 21 22 23 24 25 26 27 28 29 30 31 32 33 34 35 36 37 38 39 40 41 42 43 44 45 46 47 48 49 50 51 52 53 54 |
#!/usr/bin/python # -*- coding: utf-8 -*- """ Avinton python endpoint swa.py """ import sys import json import psycopg2 import psycopg2.extensions psycopg2.extensions.register_type(psycopg2.extensions.UNICODE) psycopg2.extensions.register_type(psycopg2.extensions.UNICODEARRAY) from flask import Flask # Import class Flask from module flask from flask_cors import CORS, cross_origin #Import flask-cors to accept access to the data app = Flask(__name__) # Construct an instance of Flask class CORS(app) # apply CORS @app.route('/') # Register index() as route handler for root URL '/' def index(): """Route handler (or View Function) for root URL '/'""" return 'Hello, you have reached the default route for the python endpoint' @app.route('/cities.json') def cities(): con = None js_string = '' try: con = psycopg2.connect(database='avinton', user='postgres') cur = con.cursor() cur.execute("""<insert your SQL here>""") js_string = str(cur.fetchone()[0]) print js_string except psycopg2.DatabaseError, e: print 'DB Error %s' % e sys.exit(1) finally: if con: con.close() return js_string @app.route('/test') def test(): return 'test' if __name__ == '__main__': # Script executed directly? app.run() # Launch built-in web server and run this Flask webapp |
Create the HTML page in the apache2 directory
(you can see which is this directory from the default page http://localhost)
|
1 2 3 4 5 6 7 8 9 10 11 12 13 14 15 |
<DOCTYPE html> <html> <head> <meta charset="utf-8"> <meta http-equiv="X-UA-Compatible" content="IE=edge"> <meta name="viewport" content="width=device-width, initial-scale=1"> <title>Data Table in Bootstrap</title> ~~~import Bootstrap source~~~ </head> <body> ~~~create table with the data~~~ </body> </html> |
Save as index.html and put it in apache2 directory.
Now the page shows you the data from Apache server!


