1. Apacheのセットアップ
|
1 |
sudo apt install apache2 |
サーバー状態の確認
|
1 |
service apache2 status |
ブラウザで確認
VM上で http://localhost に接続し、Apacheのテストページが表示されていることを確認してください。
2. PythonでPostgreSQLに問い合わせを送る
PostgreSQLによるデータ分析で使ったデータを今回も使います。
環境構築
|
1 2 3 4 5 6 7 8 9 10 11 12 13 14 15 16 17 18 19 20 21 22 23 24 25 |
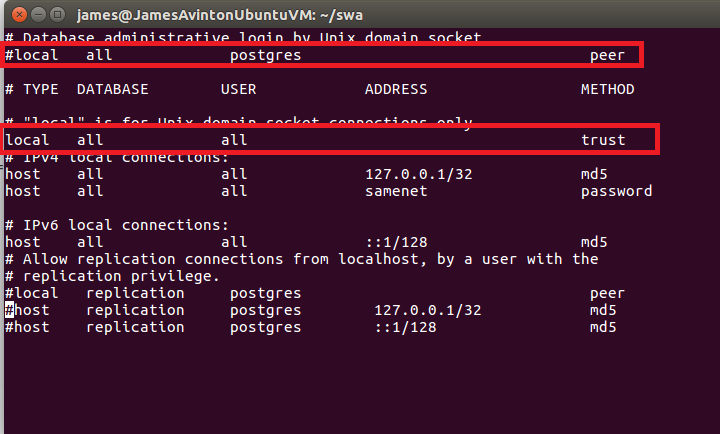
# ホームディレクトリへ cd ~ # 今回用のディレクトリを作成 mkdir swa # 作成したディレクトリに移動 cd swa # Pythonファイルを作成 touch swa.py # PostgreSQLに接続するモジュールをインストールします sudo apt-get install python3-psycopg2 # Flaskを使うためのモジュールをインストールします sudo pip install setuptools # Flask(Python向けウェブフレームワーク)をインストールします sudo pip install Flask # PostgreSQLにPythonからの要求を受け取る設定をします。 sudo vi /etc/postgresql/12/main/pg_hba.conf # 赤枠内の設定を書き換えてください。 |

|
1 2 3 |
# PostgreSQLサーバーを再起動します sudo service postgresql stop sudo service postgresql start |
環境設定は以上です。
Challenge!
ウェブアプリケーションのサンプル
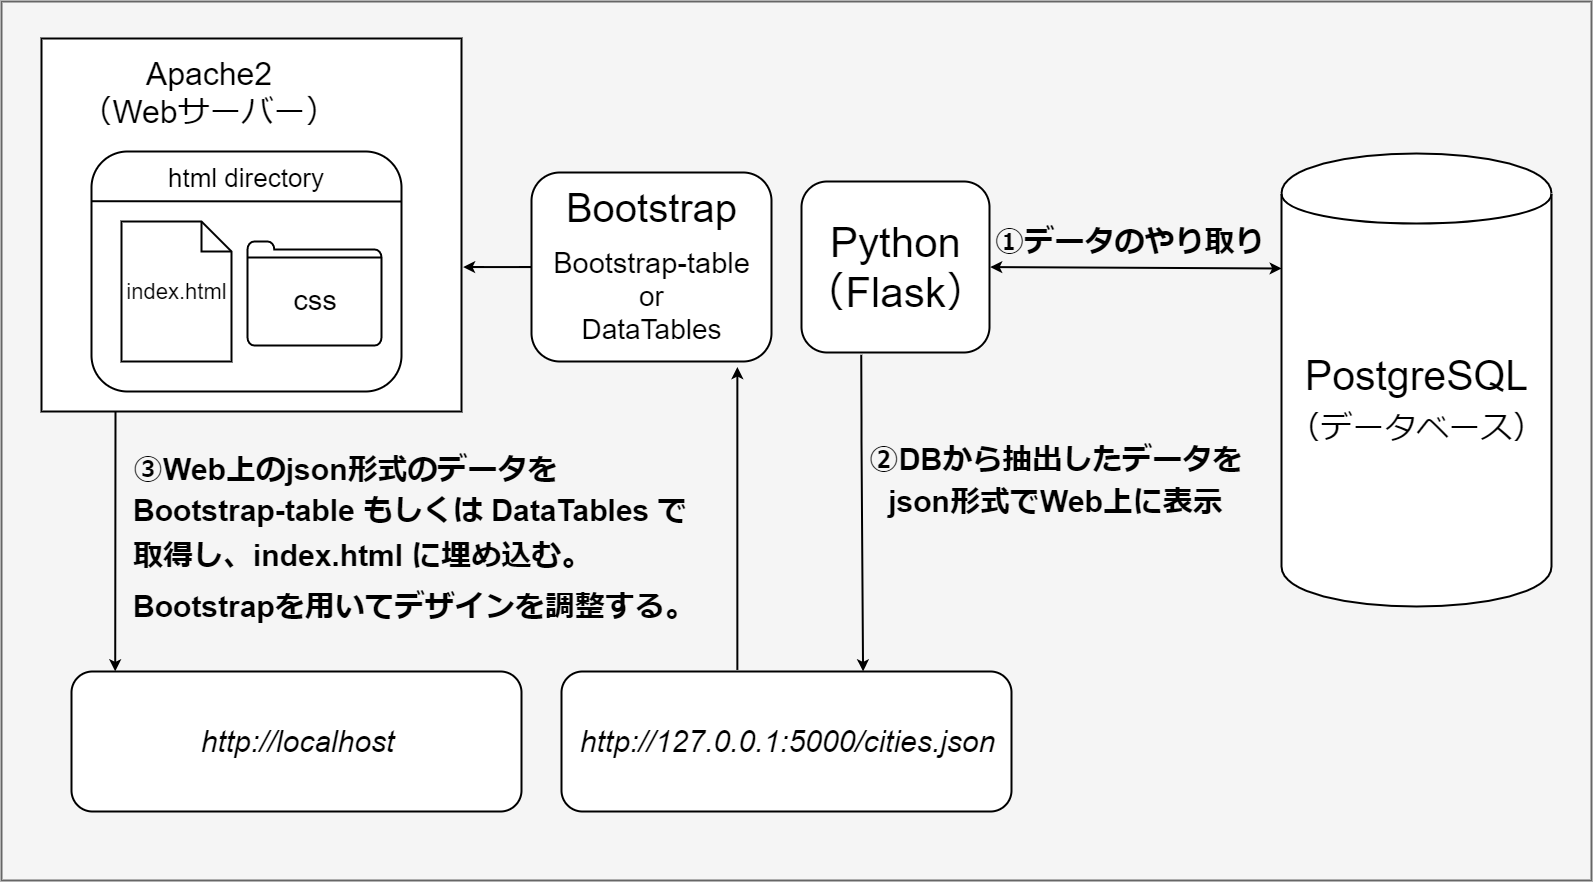
複数の技術を組み合わせて簡単なウェブアプリケーションのサンプルを作る演習をします。 具体的には、PythonからPostgreSQLデータベースに問い合わせし、その内容をApacheサーバーを経由してBootstrapウェブページ上に表示します。 表示されたウェブページではjapan_cities内の検索ができるように、検索機能を追加します。 それぞれの関係性を図に表すと以下のようになります。

ヒント:
SQL in JSON
下記のSQLコードを用いて、データベースのデータをJSON形式で取得できます。
|
1 2 3 4 5 6 7 8 9 |
select jsonb_pretty(to_jsonb(array_agg(json_build_object( 'prefecture', prefecture, 'city', city, 'ward', ward, 'population', population, 'city_ward', city_ward)))) from japan_cities; |
Bootstrap Table で手軽にテーブルを作成できます。
FlaskはこのようなPythonコードで動作します。
|
1 2 3 4 5 6 7 8 9 10 11 12 13 14 15 16 17 18 19 20 21 22 23 24 25 26 27 28 29 30 31 32 33 34 35 36 37 38 39 40 41 42 43 44 45 46 47 48 49 50 |
import sys import json import psycopg2 import psycopg2.extensions psycopg2.extensions.register_type(psycopg2.extensions.UNICODE) psycopg2.extensions.register_type(psycopg2.extensions.UNICODEARRAY) from flask import Flask # Import class Flask from module flask from flask_cors import CORS, cross_origin #Import flask-cors to accept access to the data app = Flask(__name__) # Construct an instance of Flask class CORS(app) # apply CORS @app.route('/') # Register index() as route handler for root URL '/' def index(): #Route handler (or View Function) for root URL '/' return 'Hello, you have reached the default route for the python endpoint' @app.route('/cities.json') def cities(): con = None js_string = '' try: con = psycopg2.connect(database='avinton', user='postgres', password='postgres', host='127.0.0.1',port='5432') cur = con.cursor() cur.execute(""" 上の SQL in JSON のSQLコード """) js_string = str(cur.fetchone()[0]) print(js_string) except psycopg2.DatabaseError as e: print('DB Error %s' % e) sys.exit(1) finally: if con: con.close() return js_string @app.route('/test') def test(): return 'test' if __name__ == '__main__': # Script executed directly? app.run() # Launch built-in web server and run this Flask webapp |
HTMLファイルをApache2のディレクトリ内に配置しましょう。
(http://localhostで表示されるのはこのページです。)
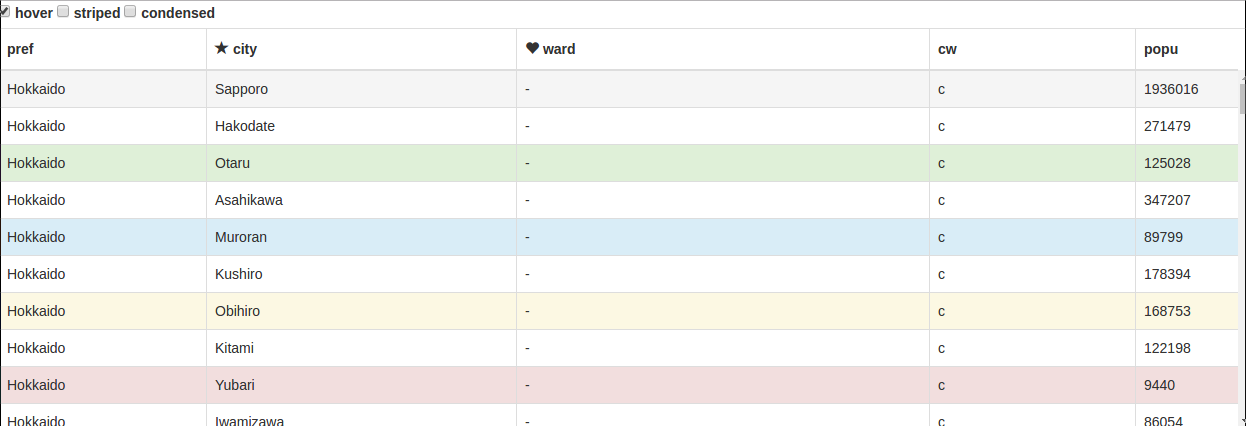
index.html としてApache2のディレクトリに保存します。 最終的には以下のように、データベースのデータをフロントエンドで表示できます。


